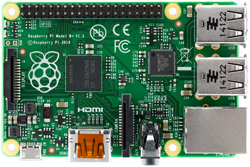
11.7 RASPBERRY PI
![]()
INTRODUCTION |
|
INSTALLATION |
The easiest way to get started is downloading the operating system installer NOOS from http://www.raspberrypi.org/downloads copying the content to a SD card (a minimum of 8 GB), and choosing the operating system Raspbian (a Linux Debian variant) when starting up. Since the distribution already includes a JRE, you will only need to copy tigerjython2.jar into a directory, for example /home/pi/tigerjython, and give the file execution rights with the file manager (under File properties). To start TigerJython, type the following command into a terminal (console): Instead of typing this command each and every time, you can specify in the file manager that files with the file type .jar are always executed using this command. You can also create a shell script. To make it even easier, you can make a desktop link proceeding as follows:
After saving, you can start TigerJython by clicking on the new icon. You will need a little bit of patience until the IDE has started on the Raspberry Pi (about one minute). Fortunately, as you will notice, running Python programs is surprisingly fast. We recommend to use a fast SD card (class 10) and the Raspberry Pi 2 Model B. |

DIGITAL INPUT/OUTPUT USING THE GPIO PORT |
|
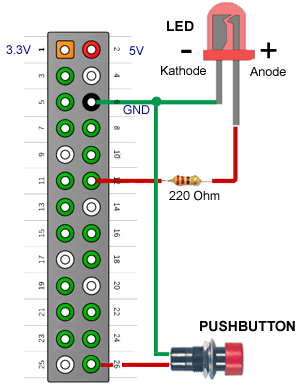
Raspberry Pi provides you with 17 digital input/output channels that can be tapped on a 26-pin connector (new version 40-pin also supports). Each channel can be defined as an output or an input with either an internal pull-up resistor, a pull-down resistor, or without a resistor. There are also 5V, 3.3V, and ground pins available on the connectors. The input voltage must never exceed 3.3V, so you should not connect external 5V-logic outputs directly to the inputs. In TigerJython, you will find the class GPIO in the module RPi_GPIO, using which you can easily address the IO ports. The module uses the library Pi4J by Robert Savage, but corresponds to the module RPi.GPIO. All the necessary files can be downloaded from here and copied into the subdirectory Lib of the directory where tigerjython2.jar is located. By default, the pins of the GPIO ports are used with the pin numbers 1..26. Each pin can be defined with GPIO.setup() as input or output channel. With GPIO.output(channel, state) can you set an output value. With GPIO.input(channel) can you read und return the current input value. You find the detailed documentation under the menu option Help > APLU Documentation.
For the demonstration of an input port you connect a key switch at pin 26. Typically you will need a few flags, so you can turn on the blinking by pressing the button and turn it off by pressing it again. from RPi_GPIO import GPIO # pin numbers switch = 26 led = 12 print "Press button turn blinking on/off" GPIO.setup(led, GPIO.OUT) GPIO.setup(switch, GPIO.IN, GPIO.PUD_UP) buttonPressed = False blinking = False ledOn = False while True: v = GPIO.input(switch) if not buttonPressed and v == GPIO.LOW: buttonPressed = True blinking = not blinking if buttonPressed and v == GPIO.HIGH: buttonPressed = False if blinking: if ledOn: ledOn = False GPIO.output(led, GPIO.LOW) else: ledOn = True GPIO.output(led, GPIO.HIGH) else: ledOn = False GPIO.output(led, GPIO.LOW) GPIO.delay(100) |
MEMO |
In the loop you first get the current state of the key switch (you "poll" it). When pressed, it connects GND to the input on pin 26, therefore input(26) returns GPIO LOW or 0. When you release the button, it causes the internal pull-up resistor to set the input to logic HIGH (3.3V), without needing to create the voltage from the outside. Since the loop is also responsible for the flashing, you use a flag blinking, that represents the on/off status. Finally, you have to remember with the flag ledOn, whether in a specific iteration of the loop the LED should be turned on or off. |
USING EVENTS |
|
It is much easier to use the event model. The pressing and releasing the button is here regarded as an event that calls automatically a function onButtonPressed(). There, you only need the flag blinking reverse. from RPi_GPIO import GPIO def onButtonPressed(channel, state): global blinking blinking = not blinking # pin numbers switch = 26 led = 12 print "Press button to turn blinking on/off" GPIO.setup(led, GPIO.OUT) GPIO.setup(switch, GPIO.IN, GPIO.PUD_UP) # pull-up resistor GPIO.add_event_detect(switch, GPIO.FALLING) # event on falling edge GPIO.add_event_callback(switch, onButtonPressed) # register callback blinking = False while True: if blinking: GPIO.output(led, 1) GPIO.delay(100) GPIO.output(led, 0) GPIO.delay(100) |
MEMO |
To use events, you must specify with the method add_event_detect(), whether you want to respond to the transition from low to high or high to low or both. After that you register with add_event_callback() a function to be called when the event occurs. |