3.11 IMAGE PROCESSING
![]()
INTRODUCTION |
|
We understand a picture as a flat, rectangular area on which there are colored forms. In printing and computer technology, one describes an image as a grid-like arrangement of colored dots called pixels. The number of pixels per unit of area is called the image resolution and it is often indicated in dots per inch (dpi). In order to save and process an image on the computer, the color must be defined as a number. There are several possibilities for this, which are called either color metrics or color models. One of the most popular models used is the RGB color model, where the intensity of the three color components red, green, and blue are represented by numbers between 0 (dark) and 255 (light) more... This corresponds to the color perception of the human eye, where three different color receptors, L, M and S cones measure the red,]. The ARGB model includes even another number between 0 and 255 that is the measure of transparency (alpha value) [more... A binary number (32 bit): bit 0..7: blue, bit 8..15: green, bit 16..23: red, bit 24..31: alpha].In short: A computer image consists of a rectangular array of pixels that are encoded as colors. This is often called a bitmap. |
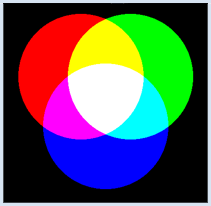
COLOR MIXING IN THE RGB MODEL |
from gpanel import * xRed = 200 yRed = 200 xGreen = 300 yGreen = 200 xBlue = 250 yBlue = 300 makeGPanel(Size(501, 501)) window(0, 501, 501, 0) # y axis downwards bm = GBitmap(500, 500) for x in range(500): for y in range(500): red = green = blue = 0 if (x - xRed) * (x - xRed) + (y - yRed) * (y - yRed) < 16000: red = 255 if (x - xGreen) * (x - xGreen) + (y - yGreen) * (y - yGreen) < 16000: green = 255 if (x - xBlue) * (x - xBlue) + (y - yBlue) * (y - yBlue) < 16000: blue = 255 bm.setPixelColor(x, y, makeColor(red, green, blue)) image(bm, 0, 500) |
MEMO |
|
Colors are defined by their red, green, and blue components. makeColor(red, green, blue) puts these color components together to a color (a color object). For images we typically use an integer coordinate system with the origin in the upper left corner, with the positive y-axis pointing down [more... You can get rounding errors because the GPanel used float coordinates]. |
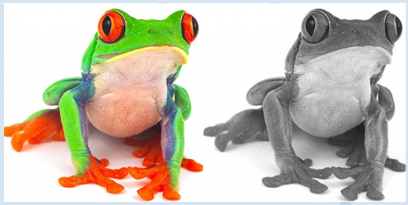
MAKING A GRAYSCALE IMAGE |
|
At some point, you may have been asked how your image processing software (such as Photoshop, etc.) actually works. Here, you will get to know some of the simple procedures. Your program can turn a color image into a grayscale image by determining the average of the red, green, and blue components, and then use these to define the gray value.
from gpanel import * size = 300 makeGPanel(Size(2 * size, size)) window(0, 2 * size, size, 0) # y axis downwards img = getImage("sprites/colorfrog.png") w = img.getWidth() h = img.getHeight() image(img, 0, size) for x in range(w): for y in range(h): color = img.getPixelColor(x, y) red = color.red green = color.green blue = color.blue intensity = (red + green + blue) / 3 gray = makeColor(intensity, intensity, intensity) img.setPixelColor(x, y, gray) image(img, size, size) |
MEMO |
|
You can determine the color values as integers from a color object using the methods color.red, color.green, color.blue. The background has to be white, not transparent. If you want to allow transparency, you can determine the transparency value with alpha = getAlpha() and then use it in a extra parameter of makeColor(red, green, blue, alpha). |
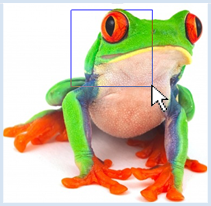
REUSABILITY |
In many image processing programs the user has to be able to select a portion of the image. For this, you can create a temporary rectangle by clicking and dragging the mouse (a "rubber band rectangle"). Once you release the mouse button, the rectangular area will be definitely chosen. It is smart to solve this subproblem first, since its code can be used again later in many other image processing applications. Reusability is a sign of quality in all software development. As you saw earlier, you can regard the drawing of the rubber band lines as an animation. In this case, however, the entire image needs to be rebuilt with each movement. A neat trick to avoid this is the XOR drawing mode. In this mode, a new figure is combined with the one underneath it so that the figure will be deleted again upon further repainting, without changing the underlying image. The disadvantage to this process is that the colors change while the figure is drawn. However, this does not usually matter in connection with rubber band rectangles.
from gpanel import * size = 300 def onMousePressed(e): global x1, y1 global x2, y2 setColor("blue") setXORMode(Color.white) # set XOR paint mode x1 = x2 = e.getX() y1 = y2 = e.getY() def onMouseDragged(e): global x2, y2 rectangle(x1, y1, x2, y2) # erase old x2 = e.getX() y2 = e.getY() rectangle(x1, y1, x2, y2) # draw new def onMouseReleased(e): rectangle(x1, y1, x2, y2) # erase old setPaintMode() # establish normal paint mode ulx = min(x1, x2) lrx = max(x1, x2) uly = min(y1, y2) lry = max(y1, y2) doIt(ulx, uly, lrx, lry) def doIt(ulx, uly, lrx, lry): print("ulx = ", ulx, "uly = ", uly) print("lrx = ", lrx, "lry = ", lry) x1 = y1 = 0 x2 = y2 = 0 makeGPanel(Size(size, size), mousePressed = onMousePressed, mouseDragged = onMouseDragged, mouseReleased = onMouseReleased) window(0, size, size, 0) # y axis downwards img = getImage("sprites/colorfrog.png") image(img, 0, size) |
MEMO |
|
You can get the bitmap for a picture that you have already stored on your computer by using getImage(), where you must specify the fully qualified name, or just a part of the path relative to the directory in which your program is located. For images located in the distribution, you use the directory name sprites. In the press event, you put the system into XOR mode, so that in your drag event handling you can delete the old rectangle by drawing it a second time, and then draw the new one. You must store the vertices in the global variables x1, y1, x2, y2. If you draw the rubber band rectangle again with the release event before you switch to paint mode, the rectangle will disappear. If you switched to paint mode first, the rectangle would stay. The program will work no matter how you decide to draw the rectangle. It always returns the correct values for ulx,uly and lrx, lry (always ulx < lrx, uly < lry). Be aware that you do not need to convert the mouse coordinates to window coordinates, since both are equal if you are using the same values for the window size with size() and the coordinate system with window(). You still get drag events if you move the mouse out of the window. You have to be careful of what you do with such coordinates, otherwise the program could crash unexpectedly. |
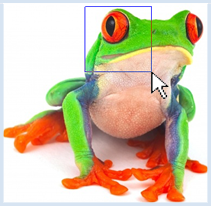
RED-EYE EFFECT |
from gpanel import * size = 300 def onMousePressed(e): global x1, y1 global x2, y2 setColor("blue") setXORMode("white") x1 = x2 = e.getX() y1 = y2 = e.getY() def onMouseDragged(e): global x2, y2 rectangle(x1, y1, x2, y2) # erase old x2 = e.getX() y2 = e.getY() rectangle(x1, y1, x2, y2) # draw new def onMouseReleased(e): rectangle(x1, y1, x2, y2) # erase old setPaintMode() ulx = min(x1, x2) lrx = max(x1, x2) uly = min(y1, y2) lry = max(y1, y2) doIt(ulx, uly, lrx, lry) def doIt(ulx, uly, lrx, lry): for x in range(ulx, lrx): for y in range(uly, lry): col = img.getPixelColor(x, y) red = col.red green = col.green blue = col. blue col1 = makeColor(3 * red / 4, green, blue) img.setPixelColor(x, y, col1) image(img, 0, size) x1 = y1 = 0 x2 = y2 = 0 makeGPanel(Size(size, size), mousePressed = onMousePressed, mouseDragged = onMouseDragged, mouseReleased = onMouseReleased) window(0, size, size, 0) # y axis downwards img = getImage("sprites/colorfrog.png") image(img, 0, size) |

MEMO |
|
The code for processing the image is latched in the function doIt()You can take everything else unchanged from the previous program. You can adjust the degree of attenuation of the color red. Here, the red intensity is set down to 75%. Be aware of the double slash, which performs an integer division (the remainder is ignored). The result is again an integer, just as it should be. The program still shows some errors which you can easily fix. Firstly, it also discolors non-red areas, and secondly, it crashes when you pull the rubber band rectangle out of the window. Of course it would be really nice if the program could find the red eyes itself. However, to do this it would have to analyze the image and recognize its contents automatically, which is an especially challenging problem in computer science [more... Image recognition is a branch of the high current pattern recognition]. |
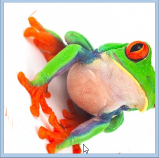
CUTTING AND STORING PICTURES |
from gpanel import * size = 300 def onMousePressed(x, y): global x1, y1 global x2, y2 setColor("blue") setXORMode("white") x1 = x2 = int(x) y1 = y2 = int(y) def onMouseDragged(x, y): global x2, y2 rectangle(x1, y1, x2, y2) # erase old x2 = int(x) y2 = int(y) rectangle(x1, y1, x2, y2) # draw new def onMouseReleased(x, y): rectangle(x1, y1, x2, y2) # erase old setPaintMode() ulx = min(x1, x2) lrx = max(x1, x2) uly = min(y1, y2) lry = max(y1, y2) doIt(ulx, uly, lrx, lry) def doIt(ulx, uly, lrx, lry): width = lrx - ulx height = lry - uly if ulx < 0 or uly < 0 or lrx > size or lry > size: return if width < 20 or height < 20: return cropped = GBitmap.crop(img, ulx, uly, lrx, lry) p = GPanel(Size(width, height)) # another GPanel p.window(0, width, 0, height) p.image(cropped, 0, 0) rc = save(cropped, "mypict.jpg", "jpg") if rc: p.title("Saving OK") else: p.title("Saving Failed") x1 = y1 = 0 x2 = y2 = 0 makeGPanel(Size(size, size), mousePressed = onMousePressed, mouseDragged = onMouseDragged, mouseReleased = onMouseReleased) window(0, size, size, 0) # y axis downwards img = getImage("sprites/colorfrog.png") image(img, 0, size) |

MEMO |
|
You can view more than one GPanel window if necessary, by creating GPanel objects. To draw, use the graphics commands which you call using the point operator. |
EXERCISES |
|

EXTRA MATERIAL |
FILTERING IMAGES WITH CONVOLUTION |
You surely know that in conventional image processing programs you are able to modify an image with various filters, such as smoothing filters, sharpening filters, blurring filters, etc. Here, the important principle of convolution is used, which you can learn about [more... Convolution is a principle that often be used in the mathematics, in the natural sciences and in the engineering]. In this process, you change the color values of each pixel by calculating a new value from it and its eight neighboring pixels, according to a filtering rule. In detail, this works as follows: For the sake of simplicity, consider a greyscale image where each pixel in the RBG coloring model possesses a gray value v between 0 and 255. The filtering rule is defined by nine numbers that are arranged in a square: m00 m01 m02
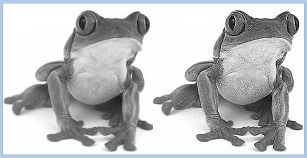
To illustrate, one could say that for the recalculation one places the convolution matrix above the pixel, multiplies its values with the underlying gray values, and finally sums them all up. The program performs these convolution operations for all of the pixels (except the boundary points) and then saves the resulting gray values in a new bitmap, which it then displays. To do this you move the convolution matrix row by row, from left to right and from top to bottom, over the image with a for structure. Here you use the convolution matrix values of a sharpening filter and the grayscale image frogbw.png of the frog.
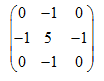
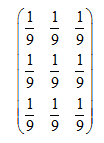
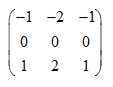
from gpanel import * size = 300 makeGPanel(Size(2 * size, size)) window(0, size, size, 0) # y axis downwards bmIn = getImage("sprites/frogbw.png") image(bmIn, 0, size) w = bmIn.getWidth() h = bmIn.getHeight() bmOut = GBitmap(w, h) #mask = [[1/9, 1/9, 1/9], [1/9, 1/9, 1/9], [1/9, 1/9, 1/9]] # smoothing mask = [[ 0, -1, 0], [-1, 5, -1], [0, -1, 0]] #sharpening #mask = [[-1, -2, -1], [ 0, 0, 0], [ 1, 2, 1]] #horizontal edge extraction #mask = [[-1, 0, 1], [-2, 0, 2], [-1, 0, 1]] #vertical edge extraction for x in range(0, w): for y in range(0, h): if x > 0 and x < w - 1 and y > 0 and y < h - 1: vnew = 0 for k in range(3): for i in range(3): c = bmIn.getPixelColor(x - 1 + i, y - 1 + k) v = c.getRed() vnew += v * mask[k][i] # Make int in 0..255 vnew = int(vnew) vnew = max(vnew, 0) vnew = min(vnew, 255) gray = Color(vnew, vnew, vnew) else: c = bmIn.getPixelColor(x, y) v = c.getRed() gray = Color(v, v, v) bmOut.setPixelColor(x, y, gray) image(bmOut, size / 2, size) |

MEMO |
In a convolution, each pixel is replaced by a weighted average of itself and its neighboring points. The filter type is determined by the convolution matrix. |
You can experiment with the following well-known convolution matrices, or you can invent your own.
|