3.9 LISTS
![]()
INTRODUCTION |
|
Sometimes you have to store values that belong together, but their exact number is not known during the creation of the program. Because of this, you will need a data structure where you can store multiple values. The structure should be flexible enough to take the order of the added values into account. It is obvious in this case to use a sequence of simple containers, which you have already heard about, namely a list. Here you will find out in detail how to work with lists.
A list with 5 elements
A list consists of individual elements arranged one after the other. In contrast to an unstructured set of elements, there is a first and a last element, and all the other elements except the last have a successor. Lists (and similar containers) are enormously important for programming. The operations possible with lists are very descriptive. The most important are:
In Python you can store any data in lists, not only numbers. The individual elements can even have a different type and you can, for example, store numbers and letters in the same list. |

GRADE LIST |
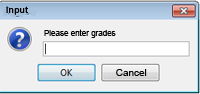
You can interpret a list as a variable. It thus has a name and a value, namely its elements. You create it with a pair of square brackets, e.g. li = [1, 2, 3] generates a list with the elements 1, 2 and 3. A list can also be empty. You can define an empty list with li = []. Grade books, where you enter the grades for a particular school subject, are a typical use of lists, let's say biology grades. At the beginning of the semester you have an empty list, which is expressed in Python as bioGrades = []. Writing in grades is then equivalent to adding list items. In Python you use the command append(), so for a score of 5 it looks like this: bioGrades.append(5).You can view the list at any time with a print command, just simply write print bioGrades. copies every list value in order to the variable grade, and you can then use this in the loop body. bioGrades = [] bioGrades.append(5.5) print(bioGrades) bioGrades.append(5) print(bioGrades) bioGrades.append(5.5) print(bioGrades) bioGrades.append(6) print(bioGrades) count = 0 for note in bioGrades: count += note print("Average: " + str(count / len(bioGrades))) |
MEMO |
|
Using the method append() you can add new elements to the end of the list. The built-in function len() returns the current length of the list. Note the interesting trick with the variable sum, with which you can create the sum to then calculate the average. You can also obtain the sum directly with the built-in function sum(bioGrades). |
LIST WITH A FIXED NUMBER OF ELEMENTS |
It is often already known how long a container list has to be, and that all elements have the same data type, when creating the program. In many programming languages you call such a data structure an array. The individual elements are usually accessed via their index. In Python there is no such data type with fixed length and instead you use a list.
from gpanel import * pA = [0, -3] pB = [5, -3] pC = [0, 7] pD = [-5, 7] makeGPanel(-10, 10, -10, 10) line(-10, 0, 10, 0) line(0, -10, 0, 10) polygon = [0] * 4 # list with 4 elements, initialized with 0 polygon[0] = pA polygon[1] = pB polygon[2] = pC polygon[3] = pD for i in range(4): k = i + 1 if k == 4: k = 0 line(polygon[i], polygon[k]) |
MEMO |
|
If you already know the length of the list when creating the program, generate a list with the initialization values 0 and then refer to the elements using the index. Remember that the index of the first element is 0 and the index of the last element is len(list) - 1. |
INSERTING AND DELETING ELEMENTS |
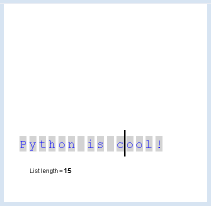
The program shows how a word processor works. The entered characters are inserted into a list of letters. It is clear that you do not know how many letters you will enter in the beginning, so a list is the ideal data structure. In addition, you see a text cursor which can be set to any position in the text with a mouse click.
from gpanel import * BS = 8 SPACE = 32 DEL = 127 def showInfo(key): text = "List length = " + str(len(letterList)) if key != "": text += ". Last key code = " + str(ord(key)) setStatusText(text) def updateGraphics(): clear() for i in range(len(letterList)): text(i, 2, letterList[i], Font("Courier", Font.PLAIN, 24), "blue", "light gray") line(cursorPos - 0.2, 1.7, cursorPos - 0.2, 2.7) def onMousePressed(x, y): setCursor(x) updateGraphics() def setCursor(x): global cursorPos pos = int(x + 0.7) if pos <= len(letterList): cursorPos = pos makeGPanel(-1, 30, 0, 12, mousePressed = onMousePressed) letterList = [] cursorPos = 0 addStatusBar(30) setStatusText("Enter Text. Backspace to delete. Mouse to set cursor.") lineWidth(3) while True: delay(10) key = getKey() if key == "": continue keyCode = ord(key) if keyCode == BS: # backspace if cursorPos > 0: cursorPos -= 1 letterList.pop(cursorPos) elif keyCode >= SPACE and keyCode != DEL: letterList.insert(cursorPos, key) cursorPos += 1 updateGraphics() showInfo(key) |
MEMO |
|
You have already learned that you can access individual elements of a list using a list index that starts at zero. For this, you use the square brackets, i.e. letterList[i]. The index must always lay in the range of 0 and list length - 1. When you use a for in range() structure the stop value is just the length of the list. You should never access an element that does not exist with the index. Errors with invalid index lists are one of the most common errors in programming. If you do not pay attention, you get programs that sometimes work and sometimes die. To test which key was pressed you can use getKey(). This function returns immediately after the call and delivers either the character of the last key pressed as string or the empty string, if no key has been pressed. |
ALREADY A PROFESSIONAL PROGRAM |
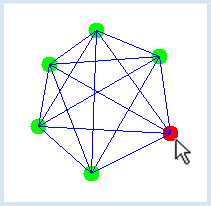
You are already able to visualize a graph with your knowledge [more... Graph Drawing is a whole topic of computer science] The task (also called "program specification") is the following:
The nodes themselves are points with two coordinates P(x, y) that you model with a point list pointlist [x, y]. It is therefore a list, that then again contains lists as elements (but with a fixed length of 2). You accomplish joining the nodes with double for loop, but you must make sure that the nodes are only connected once. from gpanel import * def drawGraph(): clear() for pt in graph: move(pt) fillCircle(2) for i in range(len(graph)): for k in range(i, len(graph)): line(graph[i], graph[k]) def onMousePressed(x, y): pt = [x, y] graph.append(pt) drawGraph() graph = [] makeGPanel(0, 100, 0, 100, mousePressed = onMousePressed) |

from gpanel import * def drawGraph(): clear() for i in range(len(graph)): move(graph[i]) if i == iNode: setColor("red") else: setColor("green") fillCircle(2) setColor("blue") for i in range(len(graph)): for k in range(i, len(graph)): line(graph[i], graph[k]) def onMousePressed(x, y): global iNode if isLeftMouseButton(): iNode = near(x, y) if isRightMouseButton(): index = near(x, y) if index != -1: graph.pop(index) iNode = -1 else: pt = [x, y] graph.append(pt) drawGraph() def onMouseDragged(x, y): if isLeftMouseButton(): if iNode == -1: return graph[iNode] = [x, y] drawGraph() def onMouseReleased(x, y): global iNode if isLeftMouseButton(): iNode = -1 drawGraph() def near(x, y): for i in range(len(graph)): p = graph[i] d = (p[0] - x) * (p[0] - x) + (p[1] - y) * (p[1] - y) if d < 10: return i return -1 graph = [] iNode = -1 makeGPanel(0, 100, 0, 100, mousePressed = onMousePressed, mouseDragged = onMouseDragged, mouseReleased = onMouseReleased) addStatusBar(20) setStatusText("Right mouse button to set nodes, left button to drag") |
MEMO |
The program is fully event-driven. The main block only defines two global variables and initializes the graphics window. For each action the entire graphics window is cleared and rebuilt with the current situation of the graph. The most important operations with lists:
The notation with square brackets is called a slice operation. start and end are indices of the list. The slice operation works similarly to the parameters of range(). |
EXERCISES |
|
|
MUTABLE AND IMMUTABLE DATA TYPES |
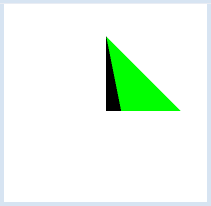
In Python all data types are stored as objects, including the numeric types (integer, float, long, complex). As you know, you can access an object by its name. It is also said that the name refers to or is bound to the object. Therefore, such a variable is also called a reference variable. A particular object can be referred to by more than one name. AN additional name is also called an alias. The following example shows how to deal with this.
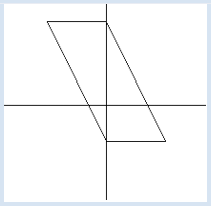
from gpanel import * makeGPanel(-10, 10, -10, 10) a = [0, 0] a_alias = a b = [0, 5] c = [5, 0] fillTriangle(a, b, c) a[0] = 1 setColor("green") fillTriangle(a_alias, b, c) |
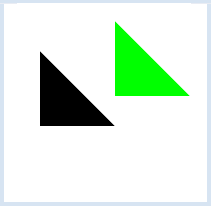
from gpanel import * makeGPanel(-10, 10, -10, 10) xA = 0 yA = 0 xA_alias = xA yA_alias = yA xB = 0 yB = 5 xC = 5 yC = 0 fillTriangle(xA, yA, xB, yB, xC, yC) xA = 1 setColor("green") fillTriangle(xA_alias, yA_alias, xB, yB, xC, yC) |

What is the explanation for that? The reason is that numbers are immutable objects and the statement xA = 1 generates a new number. xA_alias is therefore still 0. The difference between immutable and mutable data types can also be seen when passing parameters to functions. When an immutable object is passed, it cannot be changed inside the function. When a mutable object is delivered, the function can change the object. Such a change is called a secondary or side effect. In order to have a good programming style, you should use side effects sparingly because they can cause some annoying misconduct that is difficult to trace.
from gpanel import * def translate(pA, pB, pC): pA[0] = pA[0] + 5 pA[1] = pA[1] + 2 pB[0] = pB[0] + 5 pB[1] = pB[1] + 2 pC[0] = pC[0] + 5 pC[1] = pC[1] + 2 makeGPanel(-10, 10, -10, 10) a = [0, 0] b = [0, 5] c = [5, 0] fillTriangle(a, b, c) translate(a, b, c) setColor("green") fillTriangle(a, b, c) |
MEMO |
|
In Python all data are stored as objects, but some objects are considered to be immutable. These objects are: numerical data types, string, byte, and tuple. All other data types are mutable. When you assign a new value to a variable of an immutable data type, a new object is created. If mutable objects are passed to a function, the function can change the objects, while immutable objects are protected from such changes. |